HeliBar Clipon Risers and Vista Cruise Throttle Lock
Heli-Bars for the VFR 800 run about $240 depending on where you buy them. I got mine
directly from Heli-Bars. They came with decent
instructions. I spent about fifteen minutes looking over the instructions, the parts, and the existing
bars before plunging into the task. I think it took me about two hours to do. But like most things,
if I had to do it again, I could probably do the whole process in thirty minutes.
By far the most difficult part of the installation is the rerouting of the throttle
cables from the outside of the forks to the inside of the forks. The instructions call for taking the
top triple clamp off, something I had little desire to do even if I did have the right tools. I opted
for taking apart the throttle housing, releasing the ends of the throttle cable, rerouting them under
the triple clamp and inside the forks, then reassembling the housing. That took the longest because I
was being really careful and taking my time so as to not screw up anything.
Once the throttle cable is rerouted, the rest is a piece of cake. The old clip-ons come
right off and the Helis go right on. As with most assembly tasks, fitting everything together loose
and then tightening everything when it's in place is the way to go. The stock grips come right off if
you stick a screw driver under them from the end and spray hairspray up inside them. Sounds crazy I
know, but it works great! Then you just slide them off and slide on the Heli-bars.
I installed a Vista Cruise throttle lock
at the same time I was doing this project. This required that there be a tad more space between
the brake master cylinder clip on the bar and the end of the starter switch housing. I had to get an
extra 1/8 to 3/16 of an inch between them. There is a hole in the bars for a small peg in the housing
to rest in. This keeps everything from spinning with the throttle when you twist it open. I used my
trusty Dremel tool to make that hole into a slot. This allowed me to slide the housing towards the bar
ends just enough to slip the mounting clip for the throttle lock in between the master cylinder clip
and the switch housing. Then it was just a matter of tightening everything up good and snug.
The instructions call for cutting small tabs off the brake and clutch master cylinder
brackets right where the hoses attach to the reservoirs. This allows the hoses to be rotated to allow
for the additional height of the bars. Once again, the use of my trusty Dremel made short work of this
requirement. Some people paint the exposed cut surface black, I left it silver. But I did grind it
smooth and pretty.
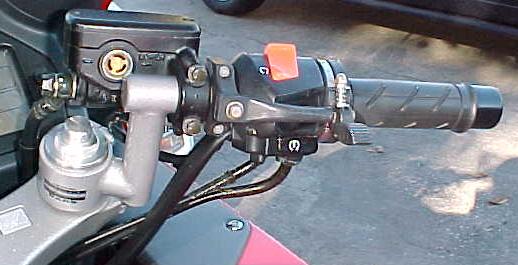
Here's a look at the install on the throttle side:
 |
 |
The throttle lock just has a ring that slides over the grip and butts up against the
flanged end of the grip. It has a rubber ring inside it that is squeezed against the grip to keep it
from slipping. When you get the throttle to a position you like, just push down on the thumb lever and
it tightens a friction ring to keep the throttle from moving. To release, just flip up the thumb
lever. The small nut atop the spring allows you to adjust the degree of friction between the metal
band and the rotating piece on the grip. I have it set tight enough to hold the throttle but loose
enough that I can override the friction even when locked. This allows for tweaking. The lock does not
behave as a "cruise control", it just sets the RPM to a fixed level like holding the grip with your
hand. You will slow going up hills and take off going down hills. But it is still great for those
times where you just want to get your hand of the grip for any reason.
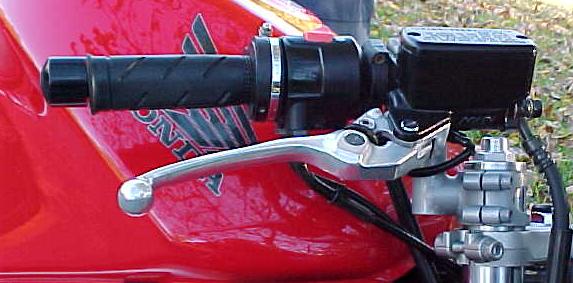
If you take a good look at the lower picture, you'll notice that the grip has a bulge
in it. I took a nail and ground the flat head off. Then I slid it up under the grip. This gives my
fingers something to hook onto so that I can relax my grip on those long rides. If needed I can roll
the nail around by pressing on it with my finger tips to fine tune its location. It tends not to move
while I am using it. This and the Vista Cruise were removed when the Hot Grips were installed.
Impressions
I have about 45,000 miles on the VFR now, all but the first few hundred of that were
done with the Heli-bars installed. I love them. The install is not that difficult if you spend just a
little time thinking about it before you start. The silver powder coat finish matches the bike and
looks great. I have not been able to detect any negative affect on the handling of the bike as some
people claim. I can still lean over the tank and engage in squiddly behavior at will with full
confidence in the handling of the bike. The long distance riding comfort is superb. I have done up
to 620 miles in a day with little, if any, soreness.
Some people might say it is better to spend on $100 on the GenMar risers that are also
available. Here's why I disagree. With the stock clip-ons installed, the brake and clutch handles
can barely be rotated forward to reduce the angle between your hand and forearm. Thus every time I
pulled in on the clutch lever or brake lever, it would hurt the top of my hand. The addition of the
GenMar risers does nothing to improve this because they simply fit under the stock clip-ons. However,
with the Heli-bars, the controls can be rotated quite a ways forward, almost allowing the wrist to be
completely straight when pulling on the levers. This is much more comfortable. Also, the stock
clip-ons cannot be rotated around the forks to move the end of the bars forward. There is a peg under
the clip-ons to prevent this rotation and the GenMars have that same peg on them. With the Heli-bars,
I could rotate the ends of the bars forward a few degrees. This allowed the lateral angle between the
hand and the forearm to be reduced. These two factors make the Heli-bars well worth the additional
price in my opinion.
The Vista Cruise throttle lock was about $40 and well worth it as well. Simply being
able to take my right hand off the grip occasionally without having to slow way down or even pulling
over is wonderful. Even if I leave my hand on the grip, I can still modulate the RPM's but I don't
have to constantly be squeezing the throttle grip. Adding the nail under the grip helped even more.
Installation of the throttle lock is a five minute task, even the first time.
|